Thursday, December 29, 2011
Monday, December 26, 2011
Bicycle Headbadges: Going Custom
A post on ecovelo some months ago noted the increasing scarcity of bicycles that come with headbadges. Alan writes:
["Getting Schooled" Alleycat Race headbadge, by Shane S. ]
What I like about Shane's work is that it is artisanal: every badge is hand made, which I think is a good match for the "expressionist woodcut" style logo I have chosen. In the course of making arrangements with him to create my headbadge we also discussed the process itself, and I paraphrase it here in case others are curious how this works.
[Boston Tweed Ride headbadge, by Shane S. ]
To order a custom headbadge, the customer needs to decide on three things: image, material and size. If you know exactly what you want your headbadge to look like, it is best to provide the exact image in electronic form. But if you just have a general idea or a theme, Shane can also create the design himself. He begins with a sketch on paper, then transitions to photoshop, resulting in a final image which is then printed out and used as a stencil to create a metal cutout. The headbadge can be flat, or it can have an etched or layered design. The latter can be done on copper, brass, and bronze.
Selecting the material for the headbadge really depends on your preferences. Brass is probably the most typical metal used for headbadges, but Shane also works with steel, aluminum, silver, copper, and bronze. Copper is relatively easy to work with because it is thin, and the green oxidation it produces can make for an interesting effect. Sterling silver (like the headbadge on the left, made for a customer) is a very special choice, but pricey. Steel is durable, but difficult to work with when it comes to fine detail. Once the headbage is completed, the surface is finished according to the customer's request: mirror, matte, or brushed. Each metal and finish has a unique look to it, and you should consider how these will suit the style and colour of your bicycle frame. I will be getting a brass headbadge for my mixte, because it is classic and will complement the "sea-mist" frame colour nicely.
The size of the headbadge is entirely up to the customer. Consider the proportions of your headtube - or measure an existing headbadge that you think is sized just perfectly.
[Cogs for Cans Charity Race headbadge, by Shane S. ]
Once the customer receives the finished headbadge, they (or their bike shop) can use a rawhide mallet to gently bend it to the shape of their head tube. Shane can drill holes in the metal to allow for screws to affix it to the bike. An alternative is to use double sided tape from 3M or epoxy to affix the head badge.
And then of course there is the matter of price. Shane's custom headbadges start at $50. The price depends on the cost of the materials (the choice of metal itself plus its size) and the complexity of the image. I was tempted to ask for a price-quote for a 14K gold headbadge with a photo-realistic rendering of my cats, but held off in case he took me seriously. If you are interested in Shane's work, get in touch via BostonBiker.org's contact page. If you have other headbadge makers to recommend in your area, feel free to chime in.
"Bicycle head badges are ...slowly being replaced by decals as a cost saving measure. I love head badges and in my opinion any bike without one feels incomplete and cheapened due to its absence. Some are works of art, while others are downright kitschy, but they all speak volumes about the bike on which they’re mounted. Let’s hope they don’t completely disappear in the coming years."I could not agree more. Both my Pashley Princess and my Rivendell Sam Hillborne frame came with beautiful headbadges, and I knew from the start that I would want one for my custom mixte as well. After looking around a bit, I discovered that Shane of BostonBiker.org is a metal worker and makes splendid bicycle headbadges.
["Getting Schooled" Alleycat Race headbadge, by Shane S. ]
What I like about Shane's work is that it is artisanal: every badge is hand made, which I think is a good match for the "expressionist woodcut" style logo I have chosen. In the course of making arrangements with him to create my headbadge we also discussed the process itself, and I paraphrase it here in case others are curious how this works.
[Boston Tweed Ride headbadge, by Shane S. ]
To order a custom headbadge, the customer needs to decide on three things: image, material and size. If you know exactly what you want your headbadge to look like, it is best to provide the exact image in electronic form. But if you just have a general idea or a theme, Shane can also create the design himself. He begins with a sketch on paper, then transitions to photoshop, resulting in a final image which is then printed out and used as a stencil to create a metal cutout. The headbadge can be flat, or it can have an etched or layered design. The latter can be done on copper, brass, and bronze.
Selecting the material for the headbadge really depends on your preferences. Brass is probably the most typical metal used for headbadges, but Shane also works with steel, aluminum, silver, copper, and bronze. Copper is relatively easy to work with because it is thin, and the green oxidation it produces can make for an interesting effect. Sterling silver (like the headbadge on the left, made for a customer) is a very special choice, but pricey. Steel is durable, but difficult to work with when it comes to fine detail. Once the headbage is completed, the surface is finished according to the customer's request: mirror, matte, or brushed. Each metal and finish has a unique look to it, and you should consider how these will suit the style and colour of your bicycle frame. I will be getting a brass headbadge for my mixte, because it is classic and will complement the "sea-mist" frame colour nicely.
The size of the headbadge is entirely up to the customer. Consider the proportions of your headtube - or measure an existing headbadge that you think is sized just perfectly.
[Cogs for Cans Charity Race headbadge, by Shane S. ]
Once the customer receives the finished headbadge, they (or their bike shop) can use a rawhide mallet to gently bend it to the shape of their head tube. Shane can drill holes in the metal to allow for screws to affix it to the bike. An alternative is to use double sided tape from 3M or epoxy to affix the head badge.
And then of course there is the matter of price. Shane's custom headbadges start at $50. The price depends on the cost of the materials (the choice of metal itself plus its size) and the complexity of the image. I was tempted to ask for a price-quote for a 14K gold headbadge with a photo-realistic rendering of my cats, but held off in case he took me seriously. If you are interested in Shane's work, get in touch via BostonBiker.org's contact page. If you have other headbadge makers to recommend in your area, feel free to chime in.
Sunday, December 25, 2011
Ocean from shipwreck
http://www.iredale.de/maritime/peter1.htm This the web site where there are photos of the Peter Iredale before it went down and right after in 1906 as well as one from 1999.
Saturday, December 24, 2011
International Woman's Day - On Bicycle
[image via Miami University Russian Studies Department]
In honor of March 8th, International Woman's Day, I give you "Collective Farm Woman on Bicycle" by my favourite Soviet painter, Alexander Deineka.
["Woman Riding a Bicycle with Grasses" by Jerry Cooke ]
... and a real Soviet "commuter" farm woman from 1960. Too bad this holiday is neglected in the USA. In Vienna I got flowers!
Friday, December 23, 2011
Price Comparisons: All Things Considered
[images via Linus Bikes and Gazelle USA]
It's Spring again, and I am receiving more emails with questions regarding which new bike to get. I notice that lots of readers are comparison shopping, and that's fantastic. But when doing price comparisons, the key is to compare like to like - which is not always what happens. Take one of the emails I received this week, from a reader who was trying to choose between a Gazelle and a Linus. She wrote that she has a hard time "justifying buying a Gazelle for three times the price, when a Linus is a perfectly nice bike."
When I checked out the prices online, it became clear that the reader was comparing the $425 Dutchie 1 (Linus's single speed,entry-levelmodel) to the $1,299 Toer Populair (Gazelle's 8-speed, deluxe model loaded with extras). But comparing the cheapest model from Brand X vs the most expensive model from Brand Y is hardly fair - especially since these manufacturers offer more equivalent models: The Linus Dutchie 3 and the Gazelle Toer Basic (pictured side by side above). Both are 3-speeds, with the Gazelle toned down a bit and the Linus fitted with some extras, somewhat leveling the playing field between them. The cost of the Linus Dutchie 3 is $589, whereas the cost of the Gazelle Basic is $849: a difference of $260. Still unjustifiable? Let'ssee what each bike offers at those price points.
[image viaGazelle USA]
At $849, the Gazelle Toer Basic offers: a lugged frame,enclosed drum brakes front and rear, dynamo lighting,a full chaincase, a matching rear rack with huge load capacity, dress guards, and a wheel lock.
[image viaLinus Bikes]
At $589, the Linus Dutchie 3 offers: a welded frame, rim brakes, no dynamo lighting or battery lights, a partial chainguard, a rear rack with lesser load capacity, no dress guards, and no wheel lock.
Even if we leave frame construction and ride quality out of it, the Gazelle's extras alone are worth over $500, which more than makes up for the $260 price difference.Are lower-end bikes a bargain? The only way to determine that is to do the comparison fairly: Have a look at all the models available, choose equivalent models for the comparison, and make a list of all the features included in each.
Wednesday, December 21, 2011
Indoor Bike Activities
Now that it's getting colder out, it's time for some indoor bike activities.
Like wrapping and shellacking handlebars. These are the new Nitto Noodle bars on the Co-Habitant's roadbike. We have wrapped and shellacked bars so often at this point, that it's become second nature. He is the wrapper. I am the shellacker. It is satisfying to smear the amber shellac onto that pristine white tape and watch it transform into a warm caramel colour. Makes me think of candy apples.
And in case you are wondering, yes those are reindeer pajama bottoms. Très chic, non?
Sunday, December 18, 2011
No Mojitos at Winkel van Sinkel
Blondine and I had lunch at Winkel van Sinkel yesterday Saturday. Blondine had the salmon bagel while I had some omelette. They were OK--4 stars out of 5.
The meet up is not just for our usual girly lunch update but to also further excite ourselves (now that sounds like this sentence needs some censoring, lol) for our up and coming CUBA TRIP which will happen in 2 weeks’ time. Yep, 2 more weeks!!! Flights have been booked 2 months ago. Hotels have been booked last week as well. Right now I am checking out the rental car.
Winkel van Sinkel, quite busy during lunch.
A quick trip to the WC (toilet). This is the basement of the restaurant that used to be a warehouse exiting to the wharf. In the old times, businessmen trade their wares by coming to Utrecht on boats and loading the wares on the below the street level wharfs.
Nevertheless we are bursting with desolate anticipation. WE CANNOT WAIT TO GO TO EXOTIC CUBA!
You know, Blondine and I have promised ourselves that we will go to Cuba before the country changes. Cuba right now is time warped. In the 50’s. We all know that Fidel Castro won’t live forever, so who knows, before we know it, Cuba might look like Miami? Oh dear, please no. So NOW is the TIME TO GO.
Now, we chose to meet up for lunch at Winkel van Sinkel because we’d love to have some Cuban introduction: MOJITOS. Trivia: Did you know that Mojitos originally came from Cuba?
The Winkel van Sinkel restaurant on Utrecht’s Oudegracht is famous for its salsa dancing and Caribbean cocktails. However, since the restaurant was packed with diners for lunch, they had nobody to concoct the cocktails for us. The waiter probably thought--Silly girls ordering Mojitos at this early hour. Haha.
Let’s just say that Sauvignon Blanc saved the day.
The facade of Winkel van Sinkel at night. Foto from http://themeet140.com/
Tonight, we might check out the free market and Queen’s Night celebrations (Koninginenacht) in Utrecht Centrum.
Visit Period: April
The case for the classic axe by Bruno Schull
The alpine ice axe revisited
The thesis of this post is that the classic mountaineering ice axe, or alpine ice axe, has been generally overlooked, with the current movement toward climbing harder and harder ice and mixed routes, and the focus on technical ice tools that such practice demands. I think that there is still an important place for the alpine ice axe in the mountains. Furthermore, I think that careful study of the alpine axe may paradoxically shed light on the design of modern technical tools, and yield new perspectives on climbing.
Who am I?
Dane, the gracious host of this blog, invited me to write a guest post, so I imagine a few words about who I am are in order. Dane always goes to great pains to emphasize that he is a normal climber, just like the rest of us; for example, he dreams about the same routes, visits the same web pages, purchases all of his own equipment, and so on. Of course, we know this is not true. Dane climbs WI 6 with one hand, he dangles upside down by his crampon points, and he leaps mountains in a single bound. I, on the other hand, truly am a normal climber. I teach high school, I live in the middle of a flat city, and I am the father of a young child, more preoccupied with changing diapers and warming bottles than plotting lines up steep faces. My only claim to fame is that for several years I worked as an instructor for the National Outdoor Leadership School (NOLS) leading mountaineering courses in the Rocky Mountains. In this capacity, I spend countless hours carrying absurdly heavy packs, wearing baggy nylon trousers, and covering my boots with high black gaitors, things for which NOLS is famous, I am told. I have lead students on easy glaciers and peak ascents, and I have introduced plenty of people to climbing on rock, snow and ice, but I am definitely not a guide; rather, I consider myself an intermediate climber, always learning, always growing, trying to find my own place in the mountains. Following blogs such as Dane’s make me feel like I am still connected to the mountains, even when my next climbing trip might be months away. I have always had an interest in the technical side of things, hence this post.
What is alpine climbing?
Because I plan to talk about alpine ice axes, perhaps the first relevant question is, “what is alpine climbing?” The best answer to this question I have seen is on Raphael Slawinski’s blog:
http://raphaelslawinski.blogspot.com//12/faux-alpinism.html
My favorite requirement for alpine climbing from Slawinski’s list is slogging, endless marching on moderate terrain, preferably through deep powder. While entertaining, this point is worth emphasizing, something made clear by Mark Houston and Kathy Cosley, in their superb book, Alpine Climbing, Techniques to Take You Higher. Houston and Cosley report that the “typical” alpine climb only requires about 20 percent roped technical climbing, as compared to 80 percent scrambling and hiking. That is the kind of climb I am thinking about when I say, “alpine ice axes.”
This is probably the place for Dane to interject, and post a picture of Steve House, Colin Haley, or some other professional, climbing a mountain with technical ice tools, perhaps followed by the caption, “Is this alpine enough for you?” While these climbs are undeniably alpine, I think the comparison is misleading in several respects. There are important differences between these types of climbers, the routes they undertake, and their equipment choices, including their ice axes, and the rest of us (more on this below). So, for now at least, I will describe an alpine ice axe as a classic mountaineering axe, with a relatively straight shaft, a spike, an adze or possibly a hammer, and a low-angled pick.
What are alpine ice axes good for?
Once, when I was a student on a mountaineering course, I asked our guide, “Are we going to carry ice axes?” To which the guide replied, “Yes, and we will try to use them for more than digging cat holes.” While alpine ice axes are effective tools for burying human waste, they do serve a wide variety of other uses in the mountains.
Probably the most obvious use of an alpine ice axe is simply as an additional balance point when walking over easy ground, like a cane, hence the common term, piolet canne. The importance of using an alpine ice axe this way cannot be overstated, especially when just starting out in the alpine world. In no particular order, alpine ice axes are also useful for self-arrest, building anchors, plunging into soft snow, clearing platforms, staking out tents, chasing marmots, threatening uncooperative climbing partners, and finally, swinging overhead, in the familiar piolet traction position, to gain purchase on steep snow or ice.
Many choices
Enter “ice axe” into an image search engine, and you will be confronted by a bewildering diversity of options. Some of these are strange creatures indeed.
Consider this axe with a telescoping trekking pole in the shaft:
http://www.petzl.com/en/outdoor/glacier-travel-ice-axes/snowscopic
This axe with a plastic grip molded into the head:
http://www.grivel.com/products/ice/ice_axes/60-futura
This axe with an aluminum pick:
http://www.camp-usa.com/products/ice-axes/corsa.asp
Or this axe with a full-length rubber grip:
http://www.petzl.com/en/outdoor/classic-mountaineering-ice-axes/summit
All of these axes, in one way or another, address the purposes described above. Broadly speaking, there are axes geared more toward walking (the piolet canne end of the spectrum) and alpine axes geared more toward climbing (the piolet traction end of the spectrum). And between two extremes, there is a wide continuum of designs, each with different features. It goes without saying that some designs are more successful than others.
For my climbing style, the best alpine ice axe on the market is the Grivel Air Tech Racing, which, despite its “technical” name is in fact a classic design with a few subtle and important innovations.
http://www.grivel.com/products/ice/ice_axes/8-air_tech_racing_sa
I like the Air Tech for many reasons. It has a substantial forged pick which holds a good edge and can be swung solidly into ice. It has a very subtle curve on the shaft which gives it some clearance while still permitting self-arrest. There are no grips on the shaft so plunging is easy. And it is very light.
However, the main reason that I like the Air Tech is related to the design of the shaft and head. The Air Tech shaft extends all the way to the top of the head—the head is slotted into a groove in the shaft and capped with a small piece of plastic. This creates a wide platform for the hand along the top of the head, making the ice axe comfortable to hold and thus secure. Not all axes are built this way.
Consider the Petzl Snowalker:
http://www.petzl.com/en/outdoor/glacier-travel-ice-axes/snowalker
The head of the Snowalker is simply a thin piece of metal resting on top of the shaft. As such, the head cuts into your hand like a blade, and makes proper use of the axe difficult.
Or the Black Diamond Raven:
http://www.blackdiamondequipment.com/en-us/shop/climb/ice-axes-piolets/raven-ice-axe/
The Raven incorporates a flattened surface along the top of the head to provide support for the hand. At first glance, this seems like a good thing. However, below the pick, there are two half-circle indentations, designed for fingers. I find this uncomfortable. My fingers get trapped in the indentations, and I can not move my hand. This difference, between simple designs which allow a variety of hand positions, and more complicated designs which lock the hand in one position, is an important concern that I will discuss in more detail below.
Length
Perhaps the most important characteristic of an alpine ice axe is length. Here, there is an interplay between a climber’s skills and the length of an ice axe. In general, beginners are better served with longer axes, which will function as added balance points on gentle ground, while more experienced climbers will be better served with progressively shorter ice axes, which only become useful on steep terrain. I had this point made abundantly clear to me when teaching a friend basic snow travel. The terrain was nearly flat, but he was using a very short axe, therefore, to progress, he had to bend over in an awkward and contrived position. For his purposes, a longer axe, which allowed him to stand in a more natural and upright position, would have made much more sense.
As climbers develop better skills, they require the assistance of an ice axes less and less. That is why you often see guides climbing with very short ice axes, while their clients are carrying long ice axes. The guides, because of their skill, can move over easy ground safely without using axes, while their clients are still in the stage where they can make good use of long axes.
To a large extent, this also explains why professionals often climb with two technical tools: their skills have progressed to the point where they simply don’t need axes most of the time, and only use the technical tools when they arrive at steep pitches. This does not change the fact that most of use can still benefit from using correctly sized alpine ice axes, which is to say, sized to both our body and our ability.
When I bought my first ice axe at a large retail store, the salesman tried to steer me toward a short axe.
“You’ll just buy a shorter axe later,” he said. Although the salesman was correct—I did eventually buy a shorter axe—I think his advice was misplaced. I made good use of my first, longer axe, and then, as my skills improved, I bought a shorter axe. I now own two Air Tech axes of different lengths, both well-worn, which reflect this progression.
Hand positions
In addition to length, another important design consideration for alpine ice axes is the variety, comfort and support of different hand positions. As you progress from easy to moderate terrain, you naturally use more hand positions, for example, switching from the cane to the self arrest position, holding the ice axe high on the shaft under the head, holding the ice axe by the adze with part of the hand aligned with the side of the pick, and so on. I won’t enter into a discussion of the various advantages and disadvantages of all the hand positions (or the equally contentious debate about which is the best grip to use, the cane position or the self arrest position, which is treated delightfully in Houston and Cosley’s book) but I do think that it is important to choose an axe which supports a wide variety of hand positions, in particular, those which suit your particular climbing style. Thus, if you like to hold an axe by the adze with the pick facing forward, choose an ice axe which supports this position, and so on. I will also say that the best axes, like the Air Tech, accommodate a wide range of hand positions naturally and comfortably, and thus easy to adapt to different terrain and techniques.
There are some ice axes which seem purposefully designed to limit hand positions:
http://www.camp-usa.com/products/ice-axes/x-lite-1421.asp
I can see that holding the X-Lite in the prominent groove built into the head might be comfortable, but it appears that many other hand positions would be impossible.
In contrast, features which make moving between different hand positions easy include simple shaft designs, rounded edges, and smooth contours. If I was asked to improve the Air Tech, one of the few changes I would make would be to round the sharp corners of the adze: I think that softer edges would allow for more fluid changes between hand positions.
Transition tools
Before I move on to technical tools, it’s worth noting that many ice axes can be classified as transition tools, or intermediate tools, which fall somewhere between alpine ice axes and technical tools. Usually, these axes include steeply-dropped picks, curved shafts, and some kind of dedicated grip.
Here are some examples from the big three:
http://www.grivel.com/products/ice/ice_axes/65-jorasses_20
http://www.petzl.com/en/outdoor/verticality/ice-axes/technical-mountaineering-ice-tool/aztarex
http://www.blackdiamondequipment.com/en-us/shop/climb/ice-axes-piolets/venom-ice-axe
One important point about these tools is that they too, like alpine ice axes, encompass a broad range of features and intended uses. These axes may be the most versatile tools on the market. The danger, of course, is falling into the “jack-of-all-trades-master-of-none” category. It probably takes an experienced climber to understand exactly how such tools can be used. Beginners are probably better served with traditional tools for mountaineering, and technical tools for steep ice and mixed.
What can alpine ice axes teach us about technical tools?
I think there are some important parallels between the design of alpine ice axes and modern technical tools. For example, I talked about the differences between the Air Tech, which supports several different hand positions, and other tools, which lock the hand in limited positions. This is a question of ergonomics, or the relationship between physical objects and our bodies.
Nearly all technical tools are designed to be ergonomic in some way. Indeed, the name of the popular and excellent Petzl Nomic is derived from the very word:
http://www.petzl.com/en/outdoor/ice-climbing-tools/nomic
Here is a similar tool:
http://www.blackdiamondequipment.com/en-us/shop/climb/technical-ice-tools/fusion-ice-tool/
And another recent offering:
http://www.grivel.com/products/ice/ice_axes/75-avatar_comp
Each of these tools provides a specific place, or a number of specific places, where your hand is designed to fit. The popularity of these tools attests to their success. However, are ergonomic tools necessarily a good thing?
Allow me to make a comparison to the design of road racing bicycles, a world which I know more about than I ever will about climbing. For nearly a century, the standard design of the road racing handlebar followed rounded curves from the tops of the handlebar through the lower sections.
http://ritcheylogic.com/dyn_prodfamily.php?k=355357
The proportions of the curves varied but the contours were always smooth. Then, in the nineties, the ergonomic handlebar was introduced, offering, it was said, more comfort, greater power, different reach, and so on.
http://ritcheylogic.com/dyn_prodfamily.php?k=299398
I find that ergonomic handlebars tend to lock my hand in a single position, or a limited number of positions, instead of allowing the infinite number of positions afforded by a traditional bend. It will probably come as no surprise that I prefer handlebars with a classic curve.
To return to ice axes, perhaps the new generation of ergonomic tools lock our hands in a single position, or a limited number of positions, instead of allowing the variety of positions which more traditional designs might offer?
Don’t get me wrong: I love my Nomics for steep ice, however, part of the reason that I prefer Nomics over other similar tools is that Nomics offer many hand positions over the length of the shaft and grip, and all of the contours are relatively smooth, making changes easy. Several times on this blog, Dane has mentioned the rounded curve of the pommel of the Nomic, and how this design allows for a good deal of rotation in the hand: this is the kind of feature which I think makes Nomics such good tools. I question the serrated spike in the new Nomics, not because of the failure issues, but because of the degree to which the spike might limit the rotation of the pommel.
Following this train of thought, I wonder if modern tools would benefit from simpler shaft designs with fewer ergonomic grips? Would ice tools with deep curves and high clearance but relatively smooth shafts work? Would such tools allow you to move your hands easily and access a wide variety of hand positions? I don’t have the answers, but I think the questions are intriguing.
Another parallel between alpine ice axes and technical tools can be found in the design of the old vs. the new Petzl Quark. Here is a link to Dane’s discussion of these tools:
http://coldthistle.blogspot.com//04/new-petzl-quark.html
I recognize the benefits of the new system: the modular adze and hammer, the ability to strip down to the tool to save weight, the improved swing, and so on. However, I have reservations about the new head design.
The Quark is a great tool for steep ice. But the Quark is also a decent all-around tool. Quarks plunge well, the head offers a wide variety of hand positions, the adze and hammer swing nicely, and with a little finesse you can even use the them for self arrest. With my Quarks, I often switch between a variety of hand positions, the same way that I do with my Air Tech. I am not sure that the new design—with the adze or hammer installed, or with these components removed—will offer the same support and comfort as the old design. As I mentioned above, I like holding my ice axe by the adze with part of my hand aligned along the head. This is very comfortable on the old Quarks but less so on the new Quarks, because a good deal of metal has been removed and the angles are all sharper. Of course, it will come down to how you intend to use the tool, but I will probably stay with my old Quarks.
New perspectives
Is there anything we can learn from this discussion about climbing itself? Perhaps the only lesson is that alpine ice axes, especially designs which incorporate some features of technical tools, like dropped picks, are quite versatile, and surprisingly capable on steep ground, including ice and mixed.
Often, I see beginners setting out to tackle relatively straightforward objectives with two technical tools strapped on their packs. Maybe this is unnecessary. Maybe a single alpine ice axe would be enough for many if not most alpine climbs. There is a certain grace, as well as a pleasing challenge, in taking only one tool on a climb. Do more with less. Or, to quote Steve House, “The simpler you make things, the richer the experience.”
So, my final advice is the following: take your old alpine ice axe out of the closet and study it closely. How can you use that axe? Would it work for that ridge traverse you are thinking about? That couloir you have been eyeing? That summit you have in mind? Perhaps your alpine ice axe can take you to greater heights than you imagined.
"Three tools...all of them being used on one climb. Only one made the climb actually possible, a classic style axe. needed just to get over the 'shrund!"
Saturday, December 17, 2011
Happy Ground Hog day! Kinzua klimbing and A day at the Cliffs
Wow... Its looking miserable outside today. Yesterday we had temps in the mid 30's and rain. The forcast was calling for a couple mild days this week. Well mild was an understatement for the start of today. I went out on the deck and it felt like spring. Sunny and 45°. The Weather channel is saying the temps are going to fall into the mid 20's and that it'll be snowing by this afternoon. I sure hope they're right. The last 48hrs most likely put a hurting on the mixed lines I've been working on as well as the ice routes I've been patiently waiting to see come into shape. I'm keeping my fingers crossed. I'll try to head out tomorrow to scope the damages. I'm sure a fresh coating of snow will make things feels wintry again. If winter comes to a screeching halt we can all blame that HOG up in Punxy for not seeing his shadow. Well enough about the weather. On to our recent climbing adventures.
Friday Jan. 28thLaura and I decided to take a short road trip up to Kinzua to climb. The climbing there is mostly casual with WI3 being the common grade. Usually its a great place for beginning leaders to cut their teeth on the sharp end. It was the location of my first ice climbing experience about 14 years ago. I've been at it ever since that first outing. In that respect Kinzua will always be a memorable place for me to visit. Laura had never been there, so we loaded up the climbingmobile and set off at 6:00am friday for the 3.5hr drive north. The drive went smooth considering the snow storm we drove in most of the way. Upon arrival, I was slightly disappointed to see the ice much thinner than what I had climbed in years past. I havn't been there in quite a few years, but every other tip I've made to Kinzua has provided FAT,blue flows. It was a real bummer since the trip was mostly for Laura to get in a bunch of time leading. Instead we pondered over which line was filled in most of the way. I could see rock through the clear ice as well as hear large amounts of running water. Seeing the ice in this current state, I decided to take the lead and check things out before Laura went up. I climbed the line directly across from the Entrance to the first parking lot. Its generally a low angle steeped WI3 with great protection. It took some searching to get in a few 13cm screws that were actually going to do something. As I climbed I could look down into the large holes and see the rock and water underneath. I reached to top and setup the belay to bring Laura up to the trees. She climbed up using her new BD Fusion ice tools. It wasn't much of a route to put them to use on, but she seemed to like them. I brought along some 8mm cord and rap rings to contribute to the local climbing community based on a post on NEice.com about the anchors being ratty and in need of replacement. I set up a station on a large tree up and left of the top out. Heres a photo of the new station and the climb.
Our second climb was to the right of the first one. It was in the little alcove. It went up the low angle start and up to a short pillar. The ice on this route was better up on the pillar, but the bottom was still somewhat hollow and not well formed. I took the line over right above the exposed rock section and belayed/rapped from there.
Well it only took two climbs and we decided to head back home to better conditions. We'll have to make another trip someday when things are more "in". All in all it was a nice quick revisit the moderates of Kinzua. will I do it again this season? Most likely not with the way conditions have been at home. There's always next season!
Sunday Jan. 30th. Laura was out for the day and I made plans with Dr. Bob to climb at the cliffs. Joel and Matt were already in town and were staying in Ohiopyle. They climbed Saturday at Upper Meadow where I guess quite a display of climbing went on. I wasn't there, but it sounded good. Anyhow... Sunday morning came and I drove to the parking area of the cliffs. It was snowed in and I did some shoveling to make parking better for those involved in the days antics. I was getting ready to hike in when Dr. Bob showed up. We split the ropes and made our way in. Dr. Bob is one of my oldest ice climbing friends. Due to life, etc. I haven't had the opportunity to spend much time on the rope with him recently as I have in the past. Bob and I decided to warm up on Called on Account of Security WI4. It was in great shape. A little new snow and some onion skin made climbing a little more interesting, but all in all it was in the best conditions I've ever seen. I led the pitch and belayed Bob from the top to shoot some pics on my new camera. Here are a few of the shots.
For our second route we decided to climb G-Gully WI4+/5- It was one of the driest routes we saw. The climb went well. It was much better than last season when we did the FFA. Bob commented many times how he enjoyed the 3D climbing that the route offered. Here's a few shots of Bob cleaning.
Joel and Matt showed up a little later than expected. They had spend the evening before getting familiarized with life in Ohiopyle. Here's a photo of Joel upon arrival at the cliffs. Needless to say there's not much to report on their activities of the day. Matt was the lone climber taking a lap on G-Gully before hiking out.
Overall there was a lot of running water and things were building fast. The Beast WI5+ was in the process of making a rare appearance. Albeit with massive amounts of water flowing down it. I hope the weather didn't take too much of a toll on it.
On the last day of season (last year), Laura and I went on an early morning mission to climb it before the day warmed to well above freezing, but were turned back by the stupidity of forgetting our ropes. It WAS just about ready for the 2nd time in 5 or 6 years... Until today's rain. With any luck the it will be climbable and I'll finally get to climb it. If not there's still lots of mixed climbs out there begging to be climbed. We'll see what the weekend holds.
The dam located directly across from the climbing |
Our first climb. Unusually thin compared to what I've typically seen here |
Laura coming up the first climb we did |
Laura seconding with trucks rumbling below. Notice our car in the lot? Worlds easiest approach! |
Our second climb was to the right of the first one. It was in the little alcove. It went up the low angle start and up to a short pillar. The ice on this route was better up on the pillar, but the bottom was still somewhat hollow and not well formed. I took the line over right above the exposed rock section and belayed/rapped from there.
Laura tooling on the second climb we did. (The steepest we could find) |
Coming up onto the belay of the 2nd climb |
Sunday Jan. 30th. Laura was out for the day and I made plans with Dr. Bob to climb at the cliffs. Joel and Matt were already in town and were staying in Ohiopyle. They climbed Saturday at Upper Meadow where I guess quite a display of climbing went on. I wasn't there, but it sounded good. Anyhow... Sunday morning came and I drove to the parking area of the cliffs. It was snowed in and I did some shoveling to make parking better for those involved in the days antics. I was getting ready to hike in when Dr. Bob showed up. We split the ropes and made our way in. Dr. Bob is one of my oldest ice climbing friends. Due to life, etc. I haven't had the opportunity to spend much time on the rope with him recently as I have in the past. Bob and I decided to warm up on Called on Account of Security WI4. It was in great shape. A little new snow and some onion skin made climbing a little more interesting, but all in all it was in the best conditions I've ever seen. I led the pitch and belayed Bob from the top to shoot some pics on my new camera. Here are a few of the shots.
Dr Bob coming up Called on Account of Security WI4 |
Dr Bob doing work! |
Bob cleaning G-Gully WI4+ |
Feeling a little fuzzy Joel? |
The Beast about touching down for the 2nd year in a row! |
Overall conditions photo from Sunday |
Saturday, December 10, 2011
Happy New Year
Last night we stayed here at Thousand Trails to ring in the New Year. They had music and dancing in the parking lot. Nathan was tired from the tournament, and so we considered leaving early a few times. At Austin's insistence, we stayed until after midnight. We had so much fun.
We were able to spend some time gabbing with another FOTR that we just met. I first read about Greg on Rich and Donna's blog Florida Picklers, and asked Nathan who Greg was because I suspected they might be another FOTR. In typical male fashion, he didn't know.
As soon as I met Greg, I asked if he was the homeschooling dad and it was him. He has been down at the pickleball courts with us for the past week so I had some time to get to know him a bit. I met Cheryl and their three children Shayna, Josiah and JJ the next day and had lots of fun getting to know Cheryl.
Sadly, they headed out today so we will probably not see them for some time. You can read about their journey here: The Kalers
The moon had a beautiful ring around it and apparently it was a blue moon also. It was nice to have that special touch from nature to watch over us as we were spending time celebrating an event of something new.
Wishing our friends and family a Happy New Year!
May bring as much peace and joy to our lives as this past year has.
Living the life in Florida!
Thursday, December 8, 2011
Tuesday, December 6, 2011
Best Wishes...
The past few days I've been a bit under the weather... until I get back, please check out the posts my fellow genea-bloggers have contributed to the Advent Calendar of Christmas Memories that has been hosted by Thomas MacEntee. I know that it has been a lot of work for you Thomas, but the time you spent putting it all together has been appreciated. Thank you Thomas! I have certainly enjoyed reading all of the articles. Thank you to everyone who participated.
To each and everyone, I wish you the best Christmas ever and may the spirit of the season be with you.
If you are in need of a good laugh (and aren't we all at some point during the holidays?) Janice Brown's video cartoons of GeneaBlogging Elves Running Amok will certainly cheer you up!
To each and everyone, I wish you the best Christmas ever and may the spirit of the season be with you.
If you are in need of a good laugh (and aren't we all at some point during the holidays?) Janice Brown's video cartoons of GeneaBlogging Elves Running Amok will certainly cheer you up!
Sunday, December 4, 2011
Hello dear
Slow game cam week, but a busy week for me. (More about that later.)
As of last weekend, most of the new Cuddeback pictures were fuzzy rear-view shots of raccoons and rabbits. This deer photo is not the model of sharpness either, but it's the best one of the lot. She's coming up out of the creek at 9:30 in the bright daylight... if I'd been looking out of the window I'd have seen her.
-----
The first Hooded Mergansers of the season arrived this week. We've already had several of the other winter birds for a while... Cedar Waxwings, White-throated Sparrows, Dark-eyed Juncos, Kinglets (Ruby-crowned and Golden-crowned), Yellow-bellied Sapsuckers, Song Sparrows, Yellow-rumped Warblers, etc.
Not many of them sing in the winter -- Song Sparrows are a nice exception. If we're lucky we might hear a Winter Wren now and then. It's one of my favorite birdsongs, but I don't hear it often. The Winter Wren also has one of my favorite latin names: Troglodytes troglodytes! My old birdwatching teacher called them feathered meatballs because of their small size. I'd say, feathered meatballs on speed. (Listen to their song to see what I mean.)
I found one dead in the yard last week and almost cried. He was so small. Ten paperclips would have balanced him on a scale.
Saturday, December 3, 2011
Satellite Trail
A long shutter exposure shows the trail of a satellite across the sky. The Pleiades star cluster and (I think), Venus, are visible in the lower left-hand corner of the photo (click on thumbnail for better view).
Taking Down Sunflowers
My neighbor had a huge bunch of wild sunflowers in her yard that had about bloomed theirselves out. She asked my son to take them down with his tractor as it was such a big job to do by hand. So down came the sunflowers. It was even a job for the tractor. But it did displace one little cottontail rabbit. I am sure it was able to find a new home out in the desert under a sagebush.
Thursday, December 1, 2011
Barter Economy
Some of my most interesting bicycle-related acquisitions have been through trades with others, and I find these barter exchanges to be great. Whether bicycle related or not, trades can work out nicely - with each party feeling as if they are getting something new and useful.
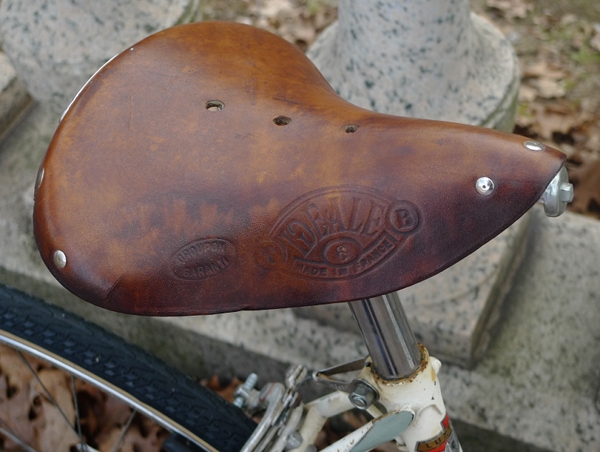
For instance, I received this vintage Ideale saddle in exchange for somevintage Brooks.
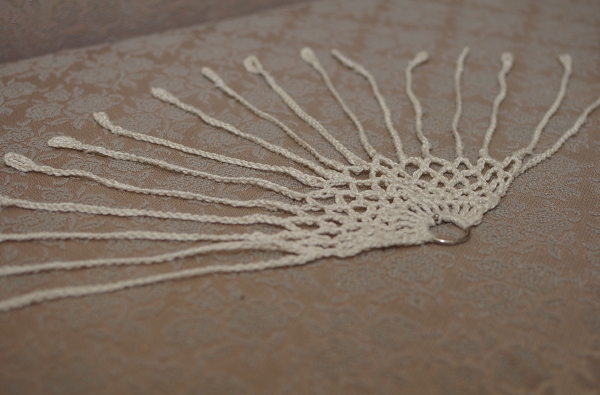
I received these beautiful dressguards in exchange for a spare saddlebag.
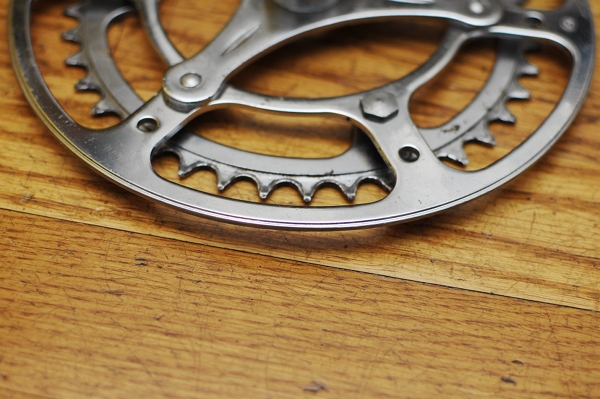
I even had some custom metalwork done in exchange for a basket.Other trades have included embroidery in exchange for a rear rack, collectible fountain pens in exchange for artwork, and products in exchange for photography.
A good place to start looking for bartering opportunities as far as bicycles go, is bikeforums. They've set up "For Trade" threads for different geographical regions, where you can list the items you have available and the items you are looking for. Here is the one for the Northeastern USA. I have been considering setting up something similar - but cannot think of a way to do it without it eating up too much of my time.
And while trades can be pre-determined and formal ("I'll give you my Item X in exchange for your Item Y"), they can also be a sort of reciprocal, whimsical gift-giving - like pen pals exchanging objects instead of letters: You send the person something you think they might like, and at some later point they do the same. There are no explicit arrangements or expectations, and that is the neat thing about it. I've had these types of exchanges with several bike people, and it's been really nice - my latest gift being the delightfully named "bike burrito."
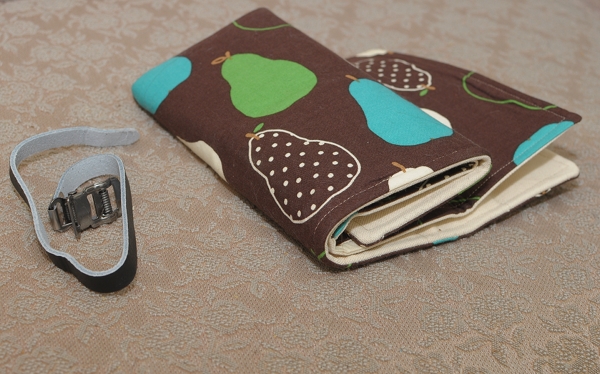
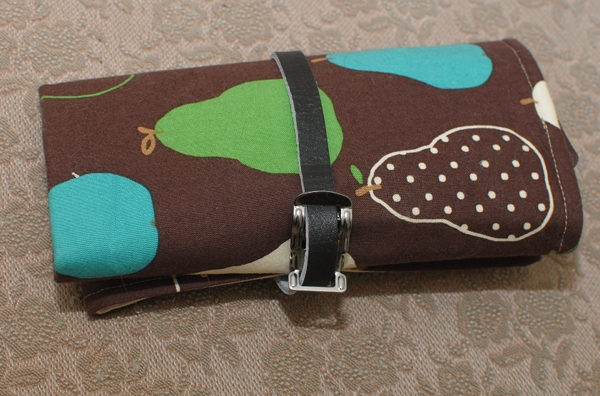
These things have fascinated me for some time, so I was pretty happy to get one. It's called a "bike burrito" because - well, it folds up like a burrito.
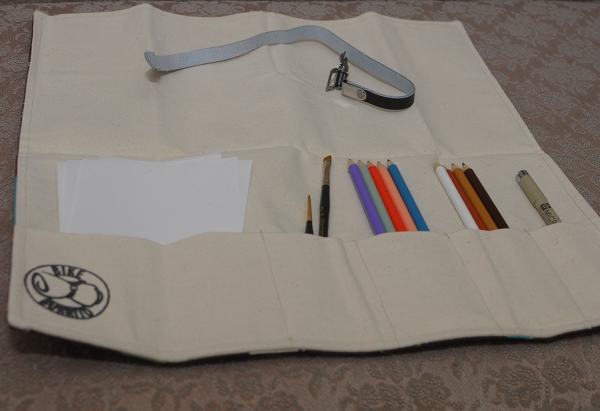
...And unfolds to reveal compartments for your tools. (We all have different concepts of "tools!")
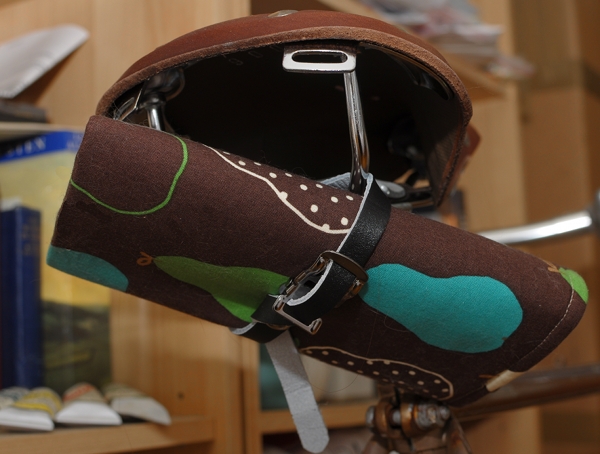
The "burrito" is held together by a toe-clip strap, which can be easily threaded through the rails under your saddle. With the "epic" winter we are having, it's safe to say that I won't be using it any time soon - but it deserves to be seen!
Connecting with other bicycle-loving people from around the world can be fun, and can lead to all sorts of exchanges you would not otherwise have. What are your thoughts on developing a system to facilitate this? Would you find it helpful? What features would be useful? Would simply using the comments section of a post be enough, or do you think it won't work without a message board? Ideas welcome!
Subscribe to:
Posts (Atom)