Only 1 month left until I return to the US and get my Pashley Princess. The anticipation is so keen, that madness has set in: I decided to get the Brooks B18 "Lady" saddle for my precious Green Beauty.
A recently re-introduced limited-edition model that was last produced in the 1930s, the B18 is embossed with a floral filigree pattern. It is a traditional lady's design that is extra wide and has a short, wrap-around nose, to accommodate riding in a skirt.
Here is the B18 in her presentation box next to the leather washer grips, before Harris Cyclery attached them both to my Pashley. Over the top? Yes, I think it is... But then, let's face it -- so is the Princess herself, so I might as well take it all the way!
Sunday, November 29, 2009
Friday, November 27, 2009
Jennifer
Our mission statement here at jjobrien climbing & style is to go where other style reporters fear to tread.
When Jennifer's high-style polish met Slider Wall's legendary trachytefriction, jjobrien was there to bring back the look.
The instagram post that caught the eye of Marketing Managementat Lorna Jane.
The camera lovesLorne jane.
Follow me on instagramat johnjobrien.
That's right, no service where I live, my battery is flat and I lock the screen rotation thing.
The poster shot.
jj
Thursday, November 26, 2009
Monday, November 23, 2009
Bike Wash!
We had big plans to go skiing over the long weekend, but they were derailed by 44°F temperatures and heavy rain, even up in Maine. So instead we "washed" our bikes.
It was the Co-Habitant's crazy idea (as you have probably noticed by now, he is much more fun than I am). We had just returned from our trip and were getting ready for a quiet night at home, when he looked out the window and proposed that the rain might be a good opportunity to wash the winter crud off the Pashleys. "Let's take them around the block," he suggested.
As we raced down a road heading out of town a half hour later, it became apparent that we were on a joyride. In a downpour. In 44°F weather. In the middle of the night. The bikes were clean and shiny when we got home, and we were soaking wet and shivering. Good times! And now for some hot tea...
Sunday, November 22, 2009
Boom, LOUD... Road closed...
The bombing operation referred to last week went by without a hitch (i.e. no one was blown up). However, it didn't solve all of the threats to the road. Unlike a typical ski patrol operation where they mitigate the hazard regularly, the snowpack above the road to Paradise grew so large that it required larger amounts of bomb making material to blast the heck out of the slopes. Good thing too, because those bombs released a substantial amount of snow that was more than ready to slide... And as for the entire day, avalanche control with the use of bombs made for a really unique NPS experience!
The explosive activity took place in an area called "Washington Cascades." That's about 1.5 miles below Paradise and just above the "Canyon Wye" (where you turn right to visit Stevens Canyon, Box Canyon, and Ohanapecosh.) As you can see to the right, Chris Olson is strapping some blasting caps to a 50 lb. bag of ammonium nitrate. This is something of a new operation for most of us (not so new to Chris). Anyway, this explosive was lowered on a plastic sled (the type your kids slide upon) into avalanche terrain where they were ignited with a "shock tube." All in all, it was impressive and really effective. Last Friday, those bombs released a number of large slides in "Washington Cascades." The slides buried the road with debris and took care of the looming avalanche hazard that threatened the road crew operators.
At this time, the road to Paradise remains closed. But that's largely due to the frequent and thunderous slides that have occurred lower on the road (i.e. well below Paradise). The rain and warmer temps activated a number of avalanche slopes. In one area, the "Christine Hairpin", located just below the Comet Falls trailhead, a slide covered both lanes of the road with over 20 feet of deposition! As far as we recall, nobody has seen this sort of debris at Christine Hairpin in the almost 20 years. Above the Glacier Bridge, there are four other significant slide paths in what we call "Glacier Hill". Slides in that area also produced similar piles of wet, heavy snow. The NPS road crew is now scratching, digging, and plowing away at the massive mounds, but it's considered that the road to Paradise may not open for another 4-7 days. As you can see in this image to the left, the road is gone/buried. Nobody has ventured above Ricksecker Point, roughly 5 miles below Paradise since Monday. Hopefully, we will be able to ski up to Paradise tomorrow, dig out the telemetry site, and see what's going on.
When thinking about the avalanche threat, we are somewhat fortunate. Warm weather has started to consolidate the snowpack and things appear a little safer this week. There is some rain in the forecast for the next 24 hours, but probably not enough to produce the large slides that observed so far. The NWAC has dropped the hazard level from Extreme to Considerable/Moderate (below 7000 feet). Stay tuned, we'll keep you up to date on what's shaking. For now, don't rely on being able to visit Paradise over the President's Day weekend. Top image by Stefan Lofgren, second by Chris Olson "The snowcovered road above Glacier Bridge."
Friday, November 20, 2009
What a Delight They Are!
Today at The Library, I met the You Go Genealogy Girls! They are delightful ladies, fun to talk with, and boy do they have some stories to tell... I saw Ruby at one of the microfilm scanner stations and thought she looked familiar (I did know they were coming here – after all, I do read their blog). So I went up to her and asked if she was one of the YGGG. (Thank goodness she was, I sure would have felt silly if she hadn't been.) We had a nice conversation then a few minutes later she brought Cheri over. To make a long story short, we snagged someone at the microfilm readers to take a photo of the four of us. The one the lady took with my camera was way out of focus but I think Carol has a good shot of all of us that she will post soon. [added May 27th - photo posted by Carol. Very good.]
Cheri Hopkins YGGG#2 and Ruby Coleman YGGG#1
Taking a tip from Carol, I decided to scan microfilm images of estate and probate records for several ancestors today. Back in the late 1980s I had taken a research trip to Ohio and had photocopied the “important” papers (those naming heirs) but that was it. I was able to find the estate records for three ancestors and scanned them. I'm hoping to get some clues from the names of the people who purchased some of the goods from the estates. And it's nice to have copies of all of the information from the estates.
There's still another week left! And I'm still hoping for that “Happy Dance” moment!
Thursday, November 19, 2009
Fall Leaves on Jemez Creek
Cottonwood trees along Jemez Creek. Most had already lost their leaves when we were there last week.
Wednesday, November 18, 2009
The 44th Regiment at Shiloh :: The Burying Ground
A signpost at the entrance to the cemetery explains “After the Battle of Shiloh, Federal details buried the dead of both sides near where they fell. The warm weather and great number of bodies made it necessary to bury the dead quickly. In 1866 the United States Government established this cemetery for the permanent burial of Union soldiers killed at Shiloh and related engagements. Bodies were recovered from the battlefield and reburied here, often in regimental groupings. The Confederate dead remain in five mass graves on the battlefield. Two-thirds of the 3,500 Civil War soldiers resting here are unknown. Many tombstones bear a number only. Others read simply: “U. S. SOLDIER.”
What the sign doesn't say is that some Union dead were also originally interred in mass graves. And that the Battle of Shiloh was one of the bloodiest battles of the Civil War – in two days the tally of those dead, wounded or missing was 13,000 on the Union side and 10,500 on the Confederate side!
The site of the burying ground for the 44th Regiment is marked “Ind 3” at the bottom center of the diagram.
The tall post to the right marks the center of the burying ground for the 44th Indiana Infantry. The stones in the foreground belong to men from Iowa regiments.
Only eight of the stones in the half-circle for the 44th have names inscribed upon them. The remaining 16 stones simply have a number. Most likely they had originally been interred where they died during battle, in graves marked by the regiment in some manner. Those who have their names inscribed probably, like Ralph Goodrick [Goodrich], died of wounds within days of the battle.
Jno. Murray (431) Company B - Captain - died April 6, 1862Frank Launners (432) Company I - Sergeant– died April 6, 1862Ralph Goodrick (433) Company B – Private – died April 6, 1862
Note: Pension records show that Ralph was wounded on the 6th and died of those wounds on April 8th. See my previous post on this.
H. C. Rill (434) PrivateW. H. Casebeer (435) Company D – Private – died April 6, 1832Unknown Number 436
Geo. Weamer (441) Company E - Private – died April 17, 1862Jno. Diclute (445) Company I – Private – died April 6, 1862Leander Hall (446) Company A – Private – died April 6, 1862
Someday, I'd like to spend some time researching these men... a quick search of the Internets garnered this bit of information on marker 441, shown above: George Weamer enlisted while a Columbia City, Indiana resident as a Private in Company G, 44th Indiana Volunteer Infantry on November 22, 1861, mustering into service the same day. He was transferred to Company E on January 2, 1862 and was wounded April 6, 1862 at the Battle of Shiloh. He died of his wounds April 17, 1862.
The 44th Regiment was formed in Fort Wayne with many of the men coming from the northeast Indiana counties of Allen, Dekalb, Noble, LaGrange, and Whitley.
Monday, November 16, 2009
Ski-Mo and the Reality of Chamonix
This is a re post from just after my last visit to Chamonix.
Jeff Street pulling some respectable local ice in his own TLTs, winter .
One thing that became glaringly obvious to me
in Chamonix was..to climb there in winter you need to ski. And not just get by
skiing but really ski. Walk like you ski and ski like you walk kind of
skiing.
I keep up on Colin's blog. Paid attention to but
didn't really clue in on the skiing. I figured, "Chamonix...when I couldn't
climb, I'd ski". How bad can it be to be me ;-)
http://www.alpineexposures.com/blogs/chamonix-conditions/7371846-super-couloir-direct-mont-blanc-du-tacul
I've
spent months at a time on skis, with a pack, a bomb or even a full size grain
shovel. But I haven't been into skiing for a while now.
This blog
started with a totally different title. I had intended the comments to high
light some of the newest gear available for BC skiing. But the truth is skiing
is just another skill, like belaying or using an ice axe that anyone that really
wants to climb mountains needs to know. The Europeans have known that from the
beginning. Their environment demands it. Two major dangers in the mountain
snow pack, avalanche and crevasses. Sure you can climb without skiing. But
you'll never be an Alpinist.
My first real AT boots were a pair of
plastic Trappeurs with a Vibram sole. Not the best sole for a decent release in
a DH binding of that era. (circa 1980) My skis were 190cm Rossignol Alp 3000.
Fat, wide and short for the day. Loved those skis. But not the panache or speed
of the 207 SMs, just more fun generally. Only the AT binding set ups kept them
from being a amazing bit of gear. To be honest one of my reasons for the lack
of excitement in skiing the last decade or so was the lack of gear that was up
to the technology available.
I still hadn't seen anything to impress me
for lwt mtn travel past Ned Gillete's Epoke 900s and 50mm bindings. We used
that gear up to 14K on Denali for over a decade. Great for mileage...not so
good on the down hill. But still way better than walking. Easier to carry the
climbing boots than ski in them.
So after skiing for a month and then
doing the high traverse off the GM and over to the north face of le Droites in
my Spantiks and a pair 180cm of BD Aspects I was well aware of the limitations
of my skill and my gear that day. Embarrassing so...and imo dangerous.
I
am seldom intimidated on a pair of skis or by terrain. Kinda goes with the the
knucklehead idea of "water ice..how hard can it be?" That morning I came to
the conclusion one could be easily killed just getting to a climb in
Chamonix. It as the first time that the thought had occurred to me after all
the talk and previous incidents and the heartfelt discussions. This while
everyone else in the basin that morning whipped by me on AT boots and generally
shorter skis. By the time I got to the face any notion of actually climbing
(it or anything else) was drained away by each patch of bare glacier ice
traverse, one kick turn and each open crevasse at a time. Places most sane
people would be roped up on. But no one ropes up in Chamonix for the "normal"
runs. And this is a ski run commonly skied by locals or guided for the
tourists. Tourists like me..
The thought of actually climbing in AT
boots (which I have detested for several reasons) at that point seemed like a
reasonable and much healthier option if you didn't first end up in the bottom of
a crevasse just getting there. (to be fair way fewer rescues in the Argentiere
than the Vallee Blanche it that is any consolation)
I had great beta and
a plan for the climb. Only the approach and decent were stopping me. When I
asked one of my acquaintances their suggestion after having just done the route
again for the umpteenth time...the only suggestion offered was "take skis up and
over".
Ya, I was fooked at that point. Out of psyche, out of time and
out of my league.
I have never been stopped on a climb because of my gear
selection. But I have questioned my own choice in gear and what I could have
done better while on route many times. I prefer not to do that on climbs
I suspect will be challenge enough with out extra weight on my back and some
funky boots to climb in.
More to come on this subject but now you know
why I have been looking at the AT ski blogs more closely. Right now I headed
out to go bc skiing for the day. A renewed passion.
Here is an idea and the gearI eventually will be using. (and I'd bet alpineclimbing and
skiing does as well)
Photo courtesy of Colin Haley @ http://colinhaley.blogspot.com/
Since that original blog back in April of ,I have spent a lot of time in a TLT5 on alpine and water ice. It has become one of my favorite ice boots.
The G20s are brand new however :)
Friends, don't let friends, climb in stainless horizontals.
Mountain travel? Apr 18,
Jeff Street pulling some respectable local ice in his own TLTs, winter .
One thing that became glaringly obvious to me
in Chamonix was..to climb there in winter you need to ski. And not just get by
skiing but really ski. Walk like you ski and ski like you walk kind of
skiing.
I keep up on Colin's blog. Paid attention to but
didn't really clue in on the skiing. I figured, "Chamonix...when I couldn't
climb, I'd ski". How bad can it be to be me ;-)
http://www.alpineexposures.com/blogs/chamonix-conditions/7371846-super-couloir-direct-mont-blanc-du-tacul
I've
spent months at a time on skis, with a pack, a bomb or even a full size grain
shovel. But I haven't been into skiing for a while now.
This blog
started with a totally different title. I had intended the comments to high
light some of the newest gear available for BC skiing. But the truth is skiing
is just another skill, like belaying or using an ice axe that anyone that really
wants to climb mountains needs to know. The Europeans have known that from the
beginning. Their environment demands it. Two major dangers in the mountain
snow pack, avalanche and crevasses. Sure you can climb without skiing. But
you'll never be an Alpinist.
My first real AT boots were a pair of
plastic Trappeurs with a Vibram sole. Not the best sole for a decent release in
a DH binding of that era. (circa 1980) My skis were 190cm Rossignol Alp 3000.
Fat, wide and short for the day. Loved those skis. But not the panache or speed
of the 207 SMs, just more fun generally. Only the AT binding set ups kept them
from being a amazing bit of gear. To be honest one of my reasons for the lack
of excitement in skiing the last decade or so was the lack of gear that was up
to the technology available.
I still hadn't seen anything to impress me
for lwt mtn travel past Ned Gillete's Epoke 900s and 50mm bindings. We used
that gear up to 14K on Denali for over a decade. Great for mileage...not so
good on the down hill. But still way better than walking. Easier to carry the
climbing boots than ski in them.
So after skiing for a month and then
doing the high traverse off the GM and over to the north face of le Droites in
my Spantiks and a pair 180cm of BD Aspects I was well aware of the limitations
of my skill and my gear that day. Embarrassing so...and imo dangerous.
I
am seldom intimidated on a pair of skis or by terrain. Kinda goes with the the
knucklehead idea of "water ice..how hard can it be?" That morning I came to
the conclusion one could be easily killed just getting to a climb in
Chamonix. It as the first time that the thought had occurred to me after all
the talk and previous incidents and the heartfelt discussions. This while
everyone else in the basin that morning whipped by me on AT boots and generally
shorter skis. By the time I got to the face any notion of actually climbing
(it or anything else) was drained away by each patch of bare glacier ice
traverse, one kick turn and each open crevasse at a time. Places most sane
people would be roped up on. But no one ropes up in Chamonix for the "normal"
runs. And this is a ski run commonly skied by locals or guided for the
tourists. Tourists like me..
The thought of actually climbing in AT
boots (which I have detested for several reasons) at that point seemed like a
reasonable and much healthier option if you didn't first end up in the bottom of
a crevasse just getting there. (to be fair way fewer rescues in the Argentiere
than the Vallee Blanche it that is any consolation)
I had great beta and
a plan for the climb. Only the approach and decent were stopping me. When I
asked one of my acquaintances their suggestion after having just done the route
again for the umpteenth time...the only suggestion offered was "take skis up and
over".
Ya, I was fooked at that point. Out of psyche, out of time and
out of my league.
I have never been stopped on a climb because of my gear
selection. But I have questioned my own choice in gear and what I could have
done better while on route many times. I prefer not to do that on climbs
I suspect will be challenge enough with out extra weight on my back and some
funky boots to climb in.
More to come on this subject but now you know
why I have been looking at the AT ski blogs more closely. Right now I headed
out to go bc skiing for the day. A renewed passion.
Here is an idea and the gearI eventually will be using. (and I'd bet alpineclimbing and
skiing does as well)
Photo courtesy of Colin Haley @ http://colinhaley.blogspot.com/
Since that original blog back in April of ,I have spent a lot of time in a TLT5 on alpine and water ice. It has become one of my favorite ice boots.
The G20s are brand new however :)
Friends, don't let friends, climb in stainless horizontals.
Lunch in Amsterdam Oud-West with the boys and a reminder about customer service in the Netherlands
It has been almost a year since Herr Philippe and I met up for dinner at Trouw Restaurantin Amsterdam. I can still recall the lovely dinner we had where I ordered this raw vegetable plate with glorious anchovies sauce on the side. That was sooooooooo good, I can still remember vividly how it tasted.
Anyway, it was time to meet up again so we decided to have lunch, together with his friend who just arrived from Orlando, USA. Let’s call him Mr. Orlando.
Café Bax Lunch
We had lunch at Café Bax in Amsterdam Oud-West, nearby where Herr Philippe lives. They both ordered the typically Dutch sandwich meal—Uitsmijter which reminds me of the Francesinha sandwich in Porto except that the uitsmijter is not swimming in tomato and beer sauce. I went for the goat’s cheese salad which was divine.
My goat cheese salad. 4 stars out of 5.
The Dutch uitsmijter - sandwich bread with ham or bacon and sunny side up eggs and melted Gouda cheese on top.
The cool painted toilet doors. Orlando kept telling us that he felt like someone is watching him. Yes my dear, Prince Claus and Queen Bea are watching you! And the bar man as well, so behave =)
Customer service you say?
Honestly, I did not expect for the food to be good here but it was pretty good! Mr. Orlando and Her Philippe on the other hand complained about their egg yolks. They want it fully cooked and Philippe even had to remind the waiter that it should be well cooked (in Dutch: gaar, doorgekookt which I even repeated to the waiter as well), but still, the eggs came back half cooked, which most people I understand prefer them this way. Well I do anyway.
So the eggs were returned to the kitchen... and when they came back for the second time around they were still soft and watery????
I told Mr. Orlando that I have given up the customer service fight in the Netherlands. The Dutch, and let me just generalise—Europeans, have a different idea of customer service. It really has nothing to do with how customer service is observed in America, in Asia and in other parts of the globe. Our idea of customer service does not exist here.
In Europe, you do not demand from a waiter or ask favours, you just order. OK? Because if you do, you will just end up frustrated, and life is too short and lovely to nitpick about this (at least in my opinion).
This is also the reason why gratuities are not very popular here. The waiters do not work for tips, they are paid with a salary, just like you and me working for a company, and with benefits as well.
Coffee, tea and moi
After lunch we went back to Philippe’s flat for some strong espresso, cappuccino and tea. And more chatting.
They are leaving for Italy (Pisa – Florence – Cinque Terre – Portovenere – Santa Margherita Ligure – Portofino) and Philippe wanted to know if I can help him with tips about this trip since I have been there several years ago. Well, I drafted for them the itinerary I just mentioned =)
The boys are now in Bella Italia and are enjoying much the Ligurian coast!
A lovely lunch again in Amsterdam, with lovely friends.
Visit Period: April
Destination: Amsterdam Oud-West, The Netherlands
Sunday, November 15, 2009
Fountain
I do not remember this large fountain being in the Patio Market the last time I was here but it looks like it has been here forever. Inside of it somewhere was a pump that kept the water constantly circulating so that it looked like the bucket was always spilling water out.
Drop Bar Hand Positions: an Introduction
Riding a roadbike does not come naturally to everyone, and one particular source of frustration is the drop handlebars. I was frustrated by them too when I first started, and so I hope this illustrated introduction might be of some help. To preface, a couple of things to keep in mind: First, drop bars vary in shape. This post assumes that your bike is fitted with theflat ramp style of bars prevalent today - either the compact type found on most stock road/racing bikes, or the more classic style popular with the twine and shellack crowd (i.e. the Nitto Noodle, Grand Bois Maes, Velo Orange Course). I am also assuming that you are using contemporary"aero" style brake levers, with the brake cables hidden.Note that if you are dealing with a 1970s-80s roadbike (i.e. something like this), the shape of the original handlebars and brake levers will make some of the positions described here impossible. Not everyone agrees on which hand positions are best to use at which times, or even on what the positions are called. This write-up reflects my non-expert personal experiences, informed by local mentours.
Whether you are racing, touring or going on a leisurely ride, what makes drop handlebars special is the variety of hand positions they offer. I consider there to be 5 distinct positions available: The hoods, the hooks, the drops, the tops, and the ramps. Read on for a description of each.
1. The Hoods
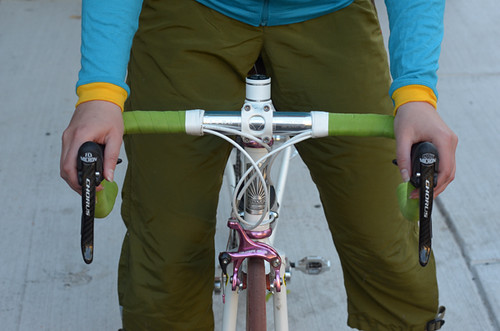
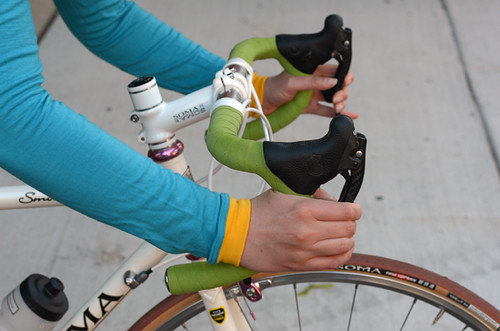
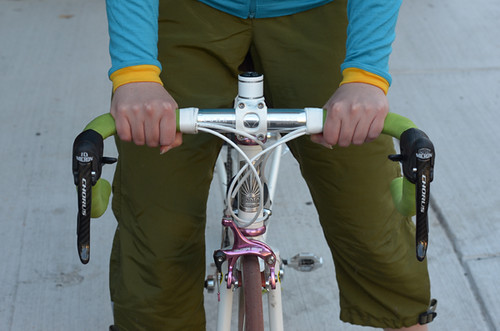
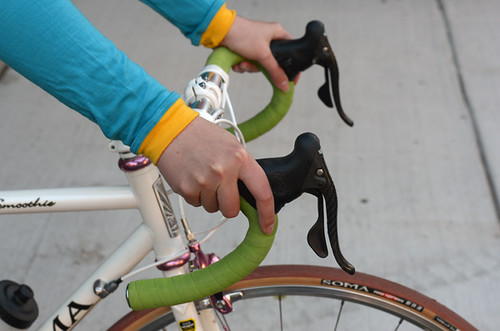
The "hoods" position refers to keeping your hands on top of the rubbery brake hoods, wrapped around them firmly. I think it is fair to say that today this is widely considered to be the standard, neutral position for riding with drop bars.When done correctly, it is extremely ergonomic, distributes the cyclist's weight nicely, and affords optimal leverage for cycling at different speeds. It is also a position from which the brake levers are easily accessible. Some cyclists report that the hoods make them lean forward too much. If this is the case, consider changing your handlebar setup - perhaps raising the bars, getting a shorter stem, or getting compact handlebars (with less distance between stem and hoods). On a properly fitted bike the hoods should feel easy and natural to reach.
There is a number of ways to hold your hands on the hoods, and this is how I usually do it. The main thing is to actually grip them and not just rest you hands upon them.
There are also different ways to brake from the hoods, and this is how I prefer to do it. Squeezing the brake lever with only two fingers while leaving the rest wrapped around the bars/hoods themselves ensures that my hands won't fly off the handlebars if I go over a bump.
For those accustomed to upright handlebars, the hoods position on a drop bar bike can feel awkward and disconcerting at first and can require some practice to use comfortably. It took me a couple of weeks before I really "got" the hoods, but once I did it's been true love. It's the position I use the most no matter what kind of riding I do. And if you are planning to take part in formal paceline training rides, chances are they will expect you to use the hoods as the standard position - and may even insist that you do so.
2. The Hooks
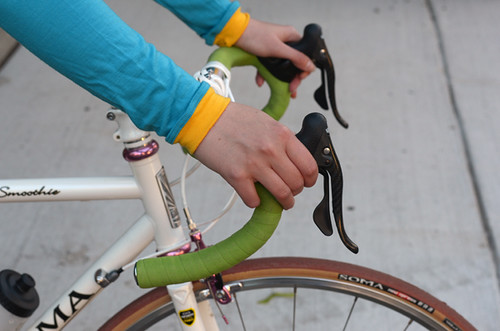
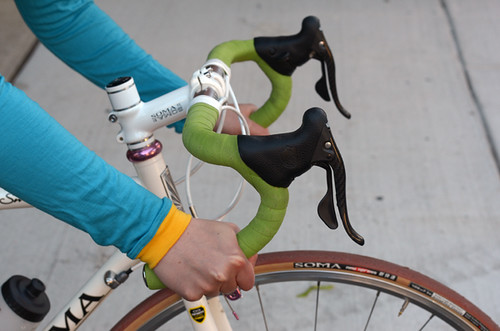
While often the position shown here is referred to as the "drops," there are actually two distinct drops positions. To differentiate between them, this one is more specifically known as "the hooks." It involves holding on to the parts of the bars that curve outward, with the cyclist's hands directly behind the brake levers. It is a more aggressive and aerodynamic position that the hoods, which makes it especially useful when cycling downhill and attempting to fight wind/air resistance.
The brake levers should be easily reachable from the hooks position. Braking in this manner is more powerful than from the hoods, because it affords greater leverage. It is important to be aware of this, so as not to accidentally slam the brakes when riding at high speeds.
3. The Drops
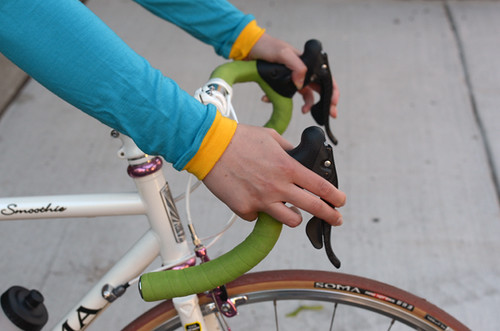
To differentiate from the hooks, this is what I will call the "true drops" position. To what extent the two positions are distinct really depends on the style of handlebars used. On some types of contemporary drop bars, the curvature here is so dramatic that the positions are very different - the true drops being parallel to the ground and the hooks perpendicular. On other drop bars the curve is less defined and it's hard to tell where the hooks end and the drops begin. Either way, the crucial distinction for me is that you can reach the brakes from the hooks, but not from this lower section of the drops.
Both the hooks and the lower drops positions are quite aggressive, and for beginners the crouching posture they put you in can feel scary. While at this stage I am more or less fine riding in these positions, even now I am still not as confident as I could be. Riding downhill in close proximity to others, I sometimes chicken out and stay on the hoods, simply bending my elbows a whole lot to get myself low enough over the bars. In a pinch, that tactic will do - but mastering the hooks and drops is ultimately worth it and I continue to work on it.
4. The Tops
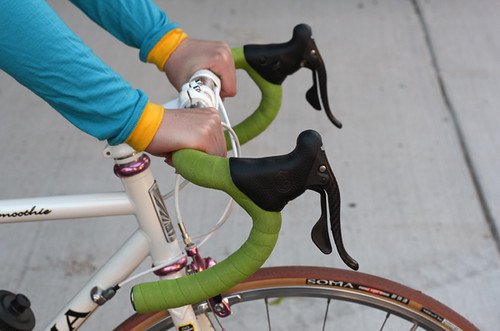
And now, the dreaded tops of the bars... My personal opinion is that the "tops" are bad news for beginners and are to be avoided until after you pick up some road cycling skills. Let me explain: Beginners who cannot use drop bars properly tend to hold their hands on the tops, because this reminds them of mountain bike handlebars and allows them to stay more upright than any of the other positions do. It feels safer. However, this is deeply problematic. First, you cannot reach the brakes from the tops. And if you are too scared to use the other positions, will you really be able to brake quickly and effectively when the situation calls for it? Probably not. Furthermore, drop bars are narrower than mountain bike handlebars, and holding the tops places the rider's hands too close to the stem - not the best position for controlling the bike. Nearly every time I see a beginner on a roadbike lose control of their bicycle, they are holding the tops.
That said, the tops do have their function. Some find this position helpful for climbing, as it opens up the chest and facilitates deep breathing. Also, when doing a long ride it's great to simply have it as yet another position for your restless hands. Personally, I almost never use the tops even in these circumstances, because my hands are uncomfortable. But not everyone has this issue.
5. The Ramps
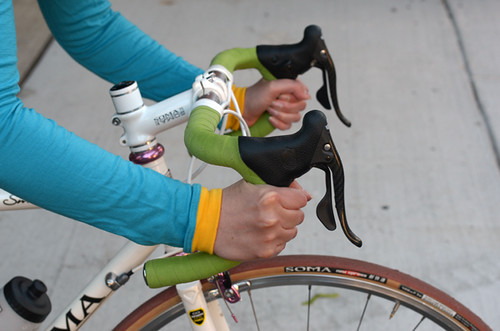
Finally, there is the rather difficult-to-photograph position called the "ramps," and I have also heard it referred to as the "shoulders." Located between the hoods and the tops, it involves holding the corners of the top portion of the handlebars. In this position the rider is more upright than on the hoods, while maintaining more control of the bike and a more ergonomic wrist position than they would on the tops. I hold my hands in this manner mostly on long rides, for short stretches at a time, when I want to do something different or be more upright for a bit.
All these new positions can certainly be overwhelming. As far as a starting point, I suggest learning to use the hoods well first, then transitioning to learning the hooks/drops. If the pictures here are not enough to help you understand the positions and the braking, ask an experienced cyclist to show you in person and imitate them. I did this some time ago, and it was more helpful than any online tutorial I could have read.And for those riding vintage bikes with handlebars like these and having trouble using them, consider updating the bar setup. You cannot use the hoods with that style of handlebars and levers, and I wish someone told me that when I first struggled with vintage roadbikes 3 years ago.
While drop handlebars are easy and intuitive for some, for others it takes practice to get comfortable with the different positions. My suggestion is to not be intimidated and just keep practicing. If you ask me, it's worth it.
Subscribe to:
Posts (Atom)